Quick Links:


Please note that all Software Update Wizard keywords are case-sensitive.
Quick Links:
Please note that all Software Update Wizard keywords are case-sensitive.
|
Keyword |
Usage |
||||||
|---|---|---|---|---|---|---|---|
[ aninteger ] |
DescriptionThe Software Update Wizard gives you several alternative methods for determining whether an update is required on a client computer. The simplest method is to use the counter in the script, described here, and compare it with a counter which is maintained on the user's computer. If the counter in the script is greater than the counter on the user's computer the update section will be processed. The counter in the script has the format: [nn] (where 'nn' is an integer number). Note that this counter is stored internally as a UINT, so the maximum counter value is 4294967295. The last complete update counter variable is maintained by the Software Update Wizard in the WebUpdateSvc4.ini file - for example: [www.dataper.demon.co.uk/prophecyupdate.txt] Therefore, the last successful update in this example was update '[6]'. The next update which will be actioned on the example PC is '[7]'. Example:[7] See also: RunAlways with FileVersion= , FileDate= , CheckFile= , CheckFileExists= and FileMD5= for more sophisticated ways to check for updates. However, this keyword is still required in every script section, although the actual value of the integer is not used to determine whether an update is required. It is still required because the script parser uses the [nn] keyword line to mark the start of a script section. DefaultThis keyword is compulsory, and must appear
as the first line in any section. |
||||||
| Testmode |
DescriptionThis optional keyword is useful for testing your server update scripts, prior to deployment. If you include this keyword line in a server script update file section, the update in that section will be processed by the Software Update Wizard, regardless of the value of [an integer] in your script or the value of the 'Counter=' value in the relevant section of the WebUpdateSvc4.ini file. The FileDate / FileVersion tests (if present) will be processed in all cases and will determine whether an update is processed. (If not present the update will be processed every time an update check is initiated.) Therefore, if the section is processed because the Testmode keyword has been used, but the FileVersion or FileDate test fails (because the file version on the user's PC is the same or newer than the parameter part of the FileVersion / FileDate test) then the update will not be made. Remember to remove this line before deploying the script, unless you want the section to be evaluated every time an update check is made. Example:TestmodeN.b. This keyword performs an identical function to the RunAlways keyword. DefaultA comparison will be made between the latest "Counter="
value in the user's WebUpdateSvc4.ini
files and the update will only be processed if the value in the '
[an integer] ' line in your script is greater
than the value from the user's INI file. |
||||||
| RunAlways |
DescriptionThis optional keyword causes a script section to always be processed, irrespective of the value of the 'Counter=' value versus the corresponding value in the user's WebUpdateSvc4.ini file. Therefore, an alternative to using 'Counter=' values to 'keep score' you may find it preferable to use a single script section in your script, which is evaluated each time and determines whether an update is needed using the CheckFile, CheckFileExists, FileDate, FileVersion and FileMD5 keywords. (See here for a description of the Software Update Wizard™'s logic for determining if an update is required.) Example:[1] N.b. This keyword performs an identical function to the Testmode keyword. DefaultThe Software Update Wizard will determine whether the 'Counter=' value is higher than the last processed counter in the user's WebUpdateSvc4.ini files and the update will only be processed if the value in the ' [an integer] ' line in your script is greater than the value from the user's INI file. |
||||||
| IniSectionID= |
DescriptionProvides an alternative WebUpdateSvc4.ini file section label to the one the Software Update Wizard uses by default. It can be any (unique) text you like. If you do not use this keyword then the url of the update script will be used as the section label in the WebUpdateSvc4.ini file. Some Software Update Wizard users generate their server script files using PHP and this keyword will be of particular value to these users. If you are not dynamically generating your server script files you probably do not need to use this keyword. Note that all keywords are unique (i.e. apply only to) the update section in which they are included. To use the same IniSectionID in subsequent update sections you must repeat the IniSectionID line. For more information on the Software Update Wizard INI files, please click this link. Example:IniSectionID=anythingyouwantDefaultThe default WebUpdateSvc4.ini file section label is used, which is the url of the update script. |
||||||
DescriptionThe virtual path (from <wwwroot>) on the server to the file that is to be downloaded by the Software Update Wizard, or its full URL, including the "http://" part.. Example:Filename=/subfolder/webupdatefile.exeor.. Filename=/webupdatefile.exe
or.. Filename=http://www.someotherserver.com/subfolder/webupdatefile.exe
As the file is downloaded the user will see a download progress dialog box. If you would like to suppress the display of this dialog box (i.e. the download occurs completely invisibly) you can append the optional text <noui> to the virtual path provided in the Filename= line, as in: Filename=http://www.someotherserver.com/subfolder/webupdatefile.exe<noui> Notes :
DefaultThis keyword is compulsory, except where you are deploying a zip file
(see Zipfile= below). Remember that you must
prefix the path using a leading '/' character, as shown in the examples
above, to indicate the <wwwroot> folder or provide the full URL of
the update file. |
|||||||
DescriptionInstead of supplying a file to download using the Filename= keyword, you can supply the path and name of a zip file on the server - e.g. /Prophecy/MyUpdates.zip (which points to the virtual web server folder <wwwroot>/Prophecy), or the full URL of the zip file, including the " http:// " part.. The Software Update Wizard will download the zip file and unzip it. Any folder structure contained in the zip file will be reproduced as subfolders of the folder supplied in the TargetFolder= keyword line, or, if no TargetFolder= keyword is supplied, off the folder in which the application which calls the Software Update Wizard application is running. Example:Zipfile=/subfolder/webupdatefile.zip or Zipfile=/webupdatefile.zip or Zipfile=http://www.someotherserver.com/subfolder/webupdatefile.zip The leading forward slash is required when you do not provide the full URL. If you omit it the file to be downloaded will not be found. By default, the Software Update Wizard does not permanently save the downloaded zip file to disc. However, should you want to also save the downloaded file to the client computer, you can append the additional text "<SaveAs=xxxx>" to the "Zipfile=" line. For example: Zipfile=/wuw/NOTEPAD.zip<SaveAs=<CLIENTFOLDER>\notepad21.zip> This line causes the Software Update Wizard to unzip the contents of the zip file AND to save the zip file to the folder equating to <CLIENTFOLDER> on the user's PC with the filename "notepad21.zip", overwriting any previous version of this file. All of the folder constants supported by the " ExecBefore= " keyword are available within the context of the "Zipfile=" "<SaveAs=..." functionality. No unzip utility is needed on the user's machine to benefit from this functionality. The Software Update Wizard has the unzip capability built in as standard. As the file is downloaded the user will see a download progress dialog box. If you would like to suppress the display of this dialog box (i.e. the download occurs completely invisibly) you can append the optional text <noui> to the virtual path provided in the Zipfile= line, as in:
While the file is being unzipped the user will see an 'Unzipping...' progress dialog. If you would like to suppress display of this dialog you can append the optional text <noprogress> to the Zipfile line, as in:
Note that the position of the <noprogress> option in the keyword line compared to the <noui> option is not significant and that the 2 options can be used individually or in combination. Notes
DefaultEach section in the Web Update script must
contain either a Filename= or a
Zipfile= keyword line. |
|||||||
| AdditionalFile= |
DescriptionThis keyword is additional to the Filename and Zipfile keywords and lets you download one or more additional files (using multiple AdditionalFiles lines) within a single script update section.You can specify a separate target folder for the file, independently of the TargetFolder for the overall section. You can make each AdditionalFile line perform the update (or not) depending on the existing file's version, MD5 value or datestamp versus the value in the script. You can provide a description of the additional file, which can be displayed (using tag substitution as shown in the example below) in your Message= notification boxes. Finally, you can provide an optional MD5 value for the file, which causes the Software Update Wizard to only persist the updated file if its MD5 stamp matches. Note that the AdditionalFile lines within an update section will only be evaluated if the section itself needs to be actioned. If the Software Update Wizard determines that the section does not need to be actioned based on the Filename/Zipfile and related checks then the AdditionalFile lines within the section will be ignored. The files downloaded as a result of AdditionalFile are always downloaded after the file downloaded by the Filename and Zipfile keywords. Multiple AdditionalFile lines in the same script are executed/downloaded in the order in which they appear in the script section, i.e. from top to bottom. Example
[1]
RunAlways¶ Filename=http://www.myserver.com/mainupdate.exe¶ FileVersion=2.0.0.0¶ AdditionalFile=http://www.myserver.com/extradll.dll|<CLIENTFOLDER> AdditionalFile=http://www.myserver.com/newdata.dat|<CLIENTFOLDER\data Message=We are updating your version of Mainupdate.exe. <AdditionalFiles> Thank you for using our software!¶ (Please note that we have included ¶ characters in the example above to make line endings clearer. In addition, the '|' character (ascii 124), which is used to separate the parameters within an AdditionalFile line, is displayed in red for better clarity.) Each AdditionalFile line has the following components, separated by a '|' character:
The Version or Date syntax for parameter 3 can be either "Version=n.n.n.n" or "Date=yyyy/mm/dd/hh/mm/ss". See FileVersion for more information about how the Software Update Wizard handles versions and file datestamps. The MD5 syntax for parameter 3 is "MD5=7c8fcc84793de6007d1f7d19d8aae7f9" where "7c8fcc84793de6007d1f7d19d8aae7f9" is the MD5 of the file referred to in the AdditionalFile line.
Tip: a download progress dialog box will be launched sequentially for
each AdditionalFile update. In order to avoid the user seeing
multiple 'flashing' download progress dialogs we recommend that
you use the <noui> option for the smaller files - e.g. AdditionalFile=http://www.myserver.com/extradll.dll<noui>|<CLIENTFOLDER>
DefaultThis keyword is optional. |
||||||
| Predownload |
DescriptionThe standard workflow of the Software Update Wizard is to check for an update first and to download the update file second. However, if you would prefer to download the update file first and notify the user second then you can use the Predownload keyword, which downloads the update files first and then notifies the user of the update. The syntax is: Predownload[<md5 of update file in Filename or Zipfile line>] Note that if you are downloading the update file before notifying the user of the update then it probably makes sense to run the download silently, using the "<noui>" option for the Filename, Zipfile and AdditionalFile keywords. Example[1]
Filename=/DBA.exe Predownload[4c2a96ec42cce780de3a0a420a2eaf2e] ... etc. ... DefaultIf this keyword is not used then the download happens after the user is advised of the update. |
||||||
| ServerTimeout |
DescriptionAn optional keyword that lets you change the default timeout value used by the WinInet libraries to download the update files from your webserver. The default server timeout value is 30 seconds. In the majority of cases this value should be adequate and is the default value set by Microsoft in WinINet.dll versions 7.x and 8.x. However, if you have very large update files or an unreliable connection then you can use this keyword to increase the timeout interval. Specify the number of seconds required as a timeout interval in this keyword line. Example:ServerTimeout=90 This line changes the server timeout used for downloading the update files to 90 seconds. |
||||||
| Throttle |
DescriptionThe default download speed for update files is 'as fast as possible'. However, particularly when your script downloads the update files before notifying the user, via the Predownload keyword, you may wish to throttle back the download speed to avoid slowing down the user's internet speed. The Throttle keyword allows you to cause the download to pause for a specified number of seconds after a specified number of megabytes of the update file have been downloaded. The syntax is: Throttle=<number of seconds to wait>,<number of megabytes downloaded> Note: This setting will persist if there are multiple update sections in your script. If you want to change the Throttle setting in a second update section just use another Throttle line. ExampleThrottle=10,3 This will cause the download to pause for 10 seconds after every 3Mb of the update file has been downloaded. DefaultIf not included in the script the downloads will operate at maximum speed. |
||||||
| MD5= |
DescriptionAn optional keyword which forces the Software Update Wizard to perform an MD5 integrity check with the downloaded file update referenced by Filename or Zipfile, before any further deployment of the downloaded update file. If the downloaded update file MD5 signature is not the same as that specified in this keyword line the script posts an error box to the user and no further action is taken. On the assumption that the integrity of the downloaded file has been compromised the Software Update Wizard also deletes the downloaded update file. Note that, as with all other keywords, the 'MD5' keyword is case-sensitive. That is, you must use "MD5" rather than "md5". Example:
[3]
Zipfile=http://www.someotherserver.com/subfolder/webupdatefile.zip MD5=388B8FBC36A8558587AFC90FB23A3B99 etc..
If the computed MD5 from webupdatefile.zip is the same as the MD5 specified in the keyword line the update will proceed as normal. If the MD5 is different the error message will be posted and the update will be aborted. There are numerous free utilities available to compute the MD5 value for a file. If you do not have one already, we use the one available here: http://onlinemd5.com. DefaultThe update will occur without any integrity checks on the downloaded file being made. |
||||||
| DialogBk= |
DescriptionAn optional keyword, which lets you specify the background colour used for the Software Update Wizard dialog boxes, in terms of their Red, Green and Blue values. Examples:DialogBk=255,255,255 The first example sets the background colour to pure white, and the second sets it to pure black. The maximum range for an individual red, green or blue value is 0 to 255. See also: Customising the 'Look and Feel' of the Software Update Wizard Dialogs When ActionedApplies to all dialogs in update script section. DefaultPure white |
||||||
| DialogTxt= |
DescriptionAn optional keyword, which lets you specify the text colour of the progress
message in the Software Update Wizard 'downloading' dialog box,
in terms of their Red, Green and Blue values. Example:DialogTxt=255,255,255 See also: Customising the 'Look and Feel' of the Software Update Wizard Dialogs When ActionedApplies to all download dialogs in update script section. DefaultNavy. |
||||||
| TitleBk= |
DescriptionAn optional keyword, which lets you specify the colours used in the graduated
title bar on the Software Update Wizard dialog boxes, in terms of their
Red, Green and Blue values. You need to specify 6 values - the first
3 are the 'from' colour (i.e. the first colour) and the second 3
are the 'to' colour. Example:TitleBk=255,255,255,0,0,0 The example sets the first colour to pure white and the second to pure black. See also: Customising the 'Look and Feel' of the Software Update Wizard Dialogs When ActionedApplies to all dialogs in update script section. DefaultAll the screenshots in this help file use the
default colour scheme, except where
specifically indicated in the text. |
||||||
| TitleTxt= |
DescriptionAn optional keyword, which lets you specify the text colour of the large (left-hand) text displayed in the graduated title bar on the Software Update Wizard dialog boxes, in terms of their Red, Green and Blue values. Example:TitleTxt=255,0,0 This sets the text colour to pure red. See also: Customising the 'Look and Feel' of the Software Update Wizard Dialogs When ActionedApplies to all dialogs in update script section. DefaultBlack |
||||||
| Bitmap= |
DescriptionAn optional keyword, which lets you specify the path on the user's PC or on the web of the bitmap which is displayed on the left hand side of the Software Update Wizard dialog boxes. The default bitmap is 92x180 pixels / 96dpi. Any bitmap you use should probably be no wider than 92 pixels, but could be a little taller - see any screenshot in this help file for how 92x180 pixels displays. A larger bitmap will be painted at 100% scale from the top left hand corner of the default bitmap's screen position. ExamplesSpecify a bitmap located on the client PC: Bitmap=c:\Windows\mybitmap.bmp
Specify a bitmap located on a web address: Bitmap=http://www.mycompany.com/mybitmap.bmp
Note that the Software Update Wizard determines whether the bitmap is located locally or on the web based on the first 7 characters of the text to the right of the '=' character. If they are "http://" then it assumes the file is located on the web, otherwise it assumes the file is located locally on the user's PC. Folder ExpansionYou can use the any of the folder substitution variables when you specify your Bitmap path: Therefore, the following keyword line in your server update script file... Bitmap=<PROGRAMFILES>\MyApp\MyFlashyBitmap.bmp ...will expand at run time to... Bitmap=c:\Program Files\MyApp\MyFlashyBitmap.bmp ... or whatever path the user's Program Files folder is registered to on the local machine. If possible, we recommend using an icon file which is already present on the user's computer rather than downloading it from a URL, as this will speed up the update process for the user. See also: Customising the 'Look and Feel' of the Software Update Wizard Dialogs When ActionedApplies to all dialogs in update script section. DefaultAll the screenshots in this help file use the default colour scheme,
except where stated. |
||||||
| Icon= |
DescriptionAn optional keyword, which lets you specify the path on the user's PC or on the web of a Windows icon file (*.ico) to replace the default Wizard icon displayed on the left hand side of the graduated title bar on the Software Update Wizard dialogs. We recommend that you use a standard size, 32 x 32 pixel icon, although the Software Update Wizard will scale your icon (up or down) to fit into the default 32 x 32 pixel size shown in the screenshots in this help file. You can use the same path substitution variables for specifying your custom icon as for the Bitmap= keyword. Examples:Icon=<PROGRAMFILES>\MyApp\MyIcon.icoIcon=http://www.mycompany.com/MyIcon.ico
Note that the Software Update Wizard determines whether the icon file is located locally or on the web based on the first 7 characters of the text to the right of the '=' character. If they are "http:// " then it assumes the file is located on the web, otherwise it assumes the file is located locally on the user's PC. If possible, we recommend using an icon file which is already present on the user's computer rather than downloading it from a URL, as this will speed up the update process for the user. See also: Customising the 'Look and Feel' of the Software Update Wizard Dialogs When ActionedApplies to all dialogs in update script section. DefaultAll the screenshots in this help file use the default colour scheme and
icon. |
||||||
| Title= |
DescriptionAn optional keyword, which lets you specify the larger text item which is displayed on the left hand side of the graduated title bar of the Software Update Wizard dialog boxes. ExampleTitle=My App Web Update You can also, optionally, change the font / font size used, by appending "<Fontname,height>" to the title text, as shown in the following examples: Set font to Tahoma, retain default font height (=20): Title=My Update<Tahoma> Set font to "Impact" and font height to 22 (logical units): Title=My Update<Impact,22> Note: there must be no spaces in the "<fontname,height>" part. Also, remember that the user may not actually have the specified font installed on their machine. In these instances the font mapper will default to a device-independent typeface.... which may not look too nice! To research fonts installed with various versions of Windows, use the database at http://channels.microsoft.com/typography/fonts/. See also: Customising the 'Look and Feel' of the Software Update Wizard Dialogs If you would like to use the current year as part of your title you can use the substitution variables "[YYYY]" and "[YY]" to display the current calendar year in your title text. Therefore, if the current calendar year is 2014 and your title line is "Title=MyApp for [YYYY]" then the displayed title at runtime will be "MyApp for 2014". The "[YY]" variant substitutes in the 2-digit year number instead. When ActionedApplies to all dialogs in update script section. Default"Software Update Wizard" |
||||||
| Subtitle= |
DescriptionOptional subtitle text which is displayed at the bottom of the graduated title bar of the Software Update Wizard dialog boxes.If you would like to use the current year as part of your title you can use the substitution variables "[YYYY]" and "[YY]" to display the current calendar year in your title text. Therefore, if the current calendar year is 2014 and your title line is "Title=MyApp for [YYYY]" then the displayed title at runtime will be "MyApp for 2014". The "[YY]" variant substitutes in the 2-digit year number instead. The default justification for the subtitle text is right-justified. You can force the justification to left-justified (starting immediately beneath the start of the first letter of the title text) or center-justified by appending the text "[LEFT]" or "[CENTER]" to the text string passed via this keyword. The text is rendered with a background shadow by default. You can cause the shadow not to be drawn by appending the text "[NOSHADOW]" to the keyword text. Example:Subtitle=© MySoftwareCompany 2015 The first example causes the text "© MySoftwareCompany 2015" to be shown, right-justified, in the sub-title area. The second example causes the same text to be shown, left-justified. The third example causes the same text to be shown centre-justified and without the default shadow being rendered. You can also change the font name and font height of the font used to display this item, using the same syntax as for Title=. See also: Customising the 'Look and Feel' of the Software Update Wizard Dialogs When ActionedApplies to all dialogs in update script section. DefaultBlank (no subtitle is shown) |
||||||
| SubTitleColor |
DescriptionSets the text colour of the subtitle text which is displayed at the bottom of the graduated title bar of the Software Update Wizard dialog boxes. The three required numbers are the red, green and blue components (with values of 0-255). ExampleSubTitleColor=255,255,0 When ActionedOnce the colour haas been set via this option all subsequent message boxes will use the colour, until it is changed by a subsequent update section in your script. DefaultThe default colour is light grey. |
||||||
| ScrollingLink= |
DescriptionThis is an optional line which adds a scrolling link to the bottom of the Software Update Wizard dialog boxes. The link scrolls continuously until the user moves their mouse over it, when it stops. If they click the link it opens in Internet Explorer. When they move their mouse away again the link restarts its scrolling from right to left across the bottom of the dialog box.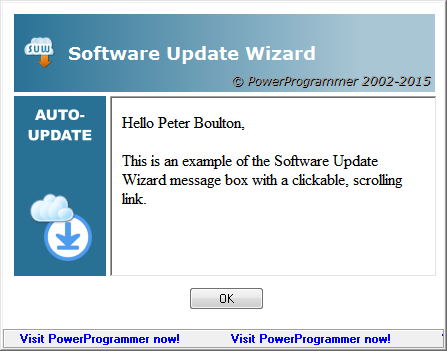 ExampleScrollingLink=Visit PowerProgrammer now!>>http://www.powerprogrammer.co.uk The first line sets the content of the scrolling link. The link will be displayed on all subsequent Software Update Wizard message boxes through to the end of the currently processing update script. The text up to >> is the text which is displayed in the scrolling link control on the message box. The text after the >> is the URL which will be launched when the user clicks the link. Therefore the second line should be used in a subsequent script section if you want to reset (i.e. remove) the scrolling link, so that the message boxes in the subsequent section do not have the scrolling link. Alternatively, you can set a new scrolling link using the syntax of the first example. DefaultThe scrolling link control will not be displayed. See also: Customising the 'Look and Feel' of the Software Update Wizard Dialogs |
||||||
| MessageBoxScale= |
DescriptionThe default size of the Software Update Wizard message boxes used by, for example, the Message or FinalMessage keywords is 447 x 321 pixels. However, if you would like to make the message boxes larger or smaller this keyword lets you scale the width and height proportionately, where a scale of 100 (percent) is the default size. The change of scale applies to the entire processing of the current update script and every message box apart from the download progress dialog box is affected. If you would like to be more selective in resizing your message boxes you can use the "<MessageBoxScale=x,y>" tag within the html of your message box text, as described in the keyword help for Message. Using the "<MessageBoxScale=x,y>" tag within the html of your message box text overrides any MessageBoxScale keywords for the specific message box in which the html is displayed. ExampleMessageBoxScale=150,120MessageBoxScale=80,80
In the first example the message boxes will be 50% wider and 20% taller than the default message box dimensions. In the second example the width and height will be 80% of the default message box dimensions. |
||||||
| ShowSystemTray= |
DescriptionThis keyword displays a system tray icon when updates are taking place.
In addition, a bubble is displayed for around 10 seconds when the tray icon
first appears. Thereafter a tooltip appears if the user's mouse
hovers over the tray icon:
You can also have a new system tray text for each update section, as shown in the following syntax:
[1]
... ShowSystemTray=Show|Processing update 1|Processing the first update|Update 1 ... [2] ... ShowSystemTray=Hide ShowSystemTray=Show|Processing update 2|Processing second update|Update 1 ...
Note that the ShowSystemTray=Hide in section [2] in the example is required and must precede the new system tray message in the script section. DefaultNo system tray icon is displayed. |
||||||
|
LoginAs=
|
DescriptionIf the update file referred to in the Filename= or Zipfile= keyword lines resides in a password protected folder on your web server then the Software Update Wizard will pop up a standard authentication dialog to prompt the user for authentication details. If your server supports challenge and response type authentication then the login name and password will be as secure as any network authentication can be. However, if you would prefer to embed the authentication details into your Software Update Wizard script so that the user does not have to supply them, you can use the LoginAs= and Password= keywords. This way the authentication process becomes completely transparent to the client user. There are 2 usage options for the LoginAs= and Password= keywords:
In addition, it is possible to encrypt either the 'Hard coded' login/password or the registry keys, so that casual readers of your script are unable to read the LoginAs and Password lines. The Software Update Wizard Project Manager utility has an 'Encrypt..' button. When you click it you will be able to encrypt the login and passwords for the update files folder on your web server:
You enter the LoginAs / Password into the edit fields. The 'Encrypt' button then encrypts them. The 'To Clipboard' button copies the correct syntax for the encrypted LoginAs/Password keyword lines to the Windows clipboard, ready for you to paste into your update script. The pasted text, based on the dialog screenshot is: LoginAs=>><[FF89][0063][0035][003A][FFD0][FFA0][002E][0043] When ActionedAs part of the download request for the URL specified in the Filename= or Zipfile= keyword line. DefaultIf the server folder requires authentication from the user to access its contents the standard Windows authentication dialog will appear and collect the user's authentication details. Example 1 - Hard Coded Use of LoginAs= and Password=[4] Example 2 - Using Registry Keys in LoginAs= and Password=[4] This script section goes to the registry keys shown below and reads their contents:
It then uses them to download the update.exe file from the Filename= line. The registry key names can be whatever you like. If the text to the right of the '=' character starts with the characters "HKEY_' then it is assumed to refer to a registry key, otherwise it is assumed to be the hard coded value. |
||||||
DescriptionNormally the Software Update Wizard maintains a log file, WebUpdateSvc4.log in the user's System32 folder, which retains a record of updates which have been made. The 'LoggingOff' keyword switches off all logging. 'LoggingOn'
switches it back on. DefaultLogging will be On.(See also: SuperLogging INI file setting and SuperLogging keyword.) |
|||||||
DescriptionAs described in the SuperLogging INI file setting help text, switching SuperLogging on in the WebUpdateSvc4.ini file captures a significantly higher level of detail of Software Update Wizard update process activity. Whereas the INI file setting applies globally, the SuperLogging keyword within an update section applies only to the update section in which it is found and the prior global setting is applied after each update section is completed. In other words, if the user has the global INI section setting set to 'N' (=no verbose logging) you can switch it on for the duration of an update section by including this keyword in the section.Please note that using the SuperLogging keyword starts verbose logging at the start of the section in which the keyword is found. The verbose startup details which are available in global SuperLogging mode will not be captured if SuperLogging is set to off in the WebUpdateSvc4.ini file. The following comparison shows the information differences: Globally ON in WebUpdateSvc4.ini:08/08/17 13:03:24 **
Waiting for WuWUI to start...** Globally OFF in WebUpdateSvc4.ini:08/08/17 14:21:33
Language file <path>\deflang.tab
loaded into WebUpdateSvc4.exe. Example[55]RunAlways SuperLogging ... etc... DefaultThe default setting will be the one specified in the WebUpdateSvc4.ini file. |
|||||||
| PollInterval= |
DescriptionThe Software Update Wizard polls for incoming update requests from clients at regular intervals. If no incoming request is detected it goes back to sleep immediately, thereby consuming negligible cpu.This keyword allows you to change the polling interval of the Software Update Wizard Service, in milliseconds. The default is once per 3 seconds (=3000). If you use this option to change the default the new setting will persist in the user's WebUpdateSvc4.ini file under 'WuWSettings' --> 'PollInterval'. Please note that polls really do involve negligible cpu. Although polling every 3 seconds sounds a lot your users will not notice any slowing of their computer as a result of running the Software Update Wizard Service. However, if you would prefer a longer polling interval then you can use this setting, which applies globally to all applications which use the Software Update Wizard. The new setting applies immediately and persists until it is changed again in a subsequent update script section. This keyword is ignored if you are using the Software Update Wizard in application mode. See Architecture of the Software Update Wizard. ExamplePollInterval=1000The syntax example above changes the polling interval to once per second (i.e. 1000 milliseconds). DefaultThe existing polling interval is used. |
||||||
| PlatformMin= |
DescriptionThe update section will only be processed if the platform (i.e. operating system) version is greater or equal to the specified platform version in this keyword line. The platform specification is based on the values returned by the Windows API GetVersionEx() function. (See also : http://msdn2.microsoft.com/en-us/library/ms724834.aspx.) Click here for a summary of the platform values for each Windows platform. ExamplePlatformMin=2,6,0
DefaultThe section will run on all platforms, unless PlatformMax is specified. |
||||||
| PlatformMax= |
DescriptionThe update section will only be processed if the platform (i.e. operating system) version is less than or equal to the specified platform version in this keyword line. The platform specification is based on the values returned by the Windows API GetVersionEx() function. (See also : http://msdn2.microsoft.com/en-us/library/ms724834.aspx.) Click here for a summary of the platform values for each Windows platform. ExamplePlatformMax=2,6,0
DefaultThe section will run on all platforms, unless PlatformMin is specified. |
||||||
| FileDate= |
DescriptionIf the file specified by either the Filename= or Zipfile= keyword line in a script section already exists on the user's PC and has a date and time stamp which is older than the one specified in this keyword line or the file does not already exist on the user's PC then the update will be processed. If you would prefer the update to be made only if the file specified by either the Filename= or Zipfile= keyword line already exists on the target computer and is older than the date specified in the FileDate line then you should add a CheckFileExists line to your update section:
[1]
RunAlways Filename=http://www.myserver.com/myapp.exe FileDate=2008/9/18/16/15/00 CheckFileExists=<CLIENTFOLDER>/myapp.exe
In the script above, the update will only be processed if it passes both the FileDate and CheckFileExists conditions. Note that the counter variable determines whether this comparison is made - i.e. if the counter variable in the script is greater than the counter variable in the user's WebUpdateSvc4.ini file then the "FileDate=" comparison will be made, otherwise it will not be made. (Tip: You can force the FileDate= check to be made every time, irrespective of the counter variable, using the RunAlways keyword.) (Please see here for a summary of the Software Update Wizard™'s logic for determining if an update is required.) SyntaxYou must specify the date/time stamp using the "yyyy/mm/dd/hh/mm/ss" format, as shown in the example: FileDate=2012/9/18/16/15/00
This keyword is optional. When ActionedPrior to downloading the file specified in the Filename or Zipfile keyword lines. DefaultIf this keyword is not used then the update file is downloaded irrespective of whether it is newer or older than the file on the user's machine. See Also: |
||||||
| FileVersion= |
DescriptionThis keyword lets you determine whether an update is necessary based on the version number of the file referred to in the Filename= section. If you are using the Zipfile option for your update file please see the CheckFile= keyword.Most Windows applications, dlls and ocx's have version numbers, which you can access by right-clicking on their filename in Windows Explorer, selecting 'Properties' from the popup menu and then clicking the 'Properties' tab. If the file specified by the Filename= keyword line in a script section already exists on the user's PC and has a file version number which is the same or newer than the one specified in this keyword line then the update will not be processed. If the version on the user's PC is older than the version in the FileVersion= line or it does not already exist then the update will be processed. If you would prefer the update to be processed only if the target folder already contains the file in question but the version in the target folder is older than the specification in the FileVersion line then you should add a CheckFileExists line to your update section, as shown in Example 2 below. Note that the counter variable determines whether this comparison is made - i.e. if the counter variable in the script is greater than the counter variable in the user's WebUpdateSvc4.ini file then the comparison will be made, otherwise it will not be made. (Tip: You can force the FileVersion= check to be made every time, irrespective of the counter variable, using the RunAlways keyword.) Note that the Software Update Wizard compares the version numbers from left to right as separate integers. Therefore version 2.0.0.0 is deemed newer than version 1.999.999.999. If the same update script section contains both a 'FileVersion=' and a ' FileDate=' keyword lines then the update is processed only if both tests are passed - i.e. on an AND basis. (Please see here for a summary of the Software Update Wizard™'s logic for determining if an update is required.) Example 1:FileVersion=1.0.0.6 Example 2:
In the above script, and update will only occur if myapp.exe already exists on the user's computer (the CheckFileExists line) and if the version on the user's computer is older than version 1.0.0.6. Without the CheckFileExists line the update would occur if the file was older than 1.0.0.6 or it did not exist on the target computer. Example 3:[1]
RunAlways Filename=http://www.myserver.com/myapp.exe FileVersion=1.1 CheckFileExists=<CLIENTFOLDER>/myapp.exe
In the above script an update will occur if the version of myapp.exe running on the user's computer is earlier than version 1.1.0.0. In other words, only the first two parts of the running application's version number will be compared with the FileVersion= text. Similarly, FileVersion=1.1.8 would update for versions prior to 1.1.8.anything. Note : This keyword is optional. The following is an extract of a resource script for an executable. The Software Update Wizard uses the highlighted item to obtain the version number: 1 VERSIONINFO Or, right clicking on the file in Windows Explorer, you will see:
When ActionedPrior to downloading the file specified in the Filename keyword lines. DefaultIf this keyword is not used then the update file is
downloaded irrespective of whether it is newer or older than the file on
the user's machine. |
||||||
| FileMD5= |
DescriptionThis keyword is one of the 3 ways of determining whether an update is required based on the update file specified in the Filename line of the update script. The 3 ways are:
(Please see here for a summary of the Software Update Wizard™'s logic for determining if an update is required.) Example:FileMD5=d3f1ffc471adaec1d20e658d3c46667f
The script section will be processed if the MD5 of the file in the Filename line of the update script has a different MD5 to the MD5 quoted on the FileMD5 line. Notes:
When ActionedPrior to downloading the file specified in the Filename keyword lines. DefaultIf this keyword is not used then the update file is downloaded irrespective of its MD5 value. |
||||||
| CheckFile= |
DescriptionThis keyword lets you determine whether a script section will be processed based on the version number, MD5 and / or date/time stamp of any file on the user's PC, rather than the file specified in the Filename or Zipfile lines, as in FileVersion, FileDate and FileMD5 described above. If the file on the user's computer is older than the version or date specified in the CheckFile line, or the MD5 of the file is different to the one specified in the CheckFile line, or the file does not already exist on the user's computer, the CheckFile test will determine that an update is required. You can use as many CheckFile lines within an update section as you like. The update will be actioned only if all of the CheckFile tests determine that an update is required. The default behaviour is that CheckFile determines an update is required
if the file exists and is older than the version or date specified in the
CheckFile line or has a different MD5, or if the file does not already exist
on the target computer. If you would prefer the update to be made
only if the file already exists on the target computer and is older/different
MD5 then you should use the CheckFileExists
keyword line, as well as the CheckFile line, as shown in Example 5 below. (Tip: You can force the FileDate= check to be made every time, irrespective of the counter variable, using the RunAlways keyword.) (Please see here for a summary of the Software Update Wizard™'s logic for determining if an update is required.) Example 1:CheckFile=<CLIENTFOLDER>\anyfile.txt<Date=2004/12/01/23/00/00>The script section will be processed if the file anyfile.txt does not exist on the user's PC or if it does exist but the date/time stamp (Date Modified) of the file on the PC is older than the date specified in the " ...<Date=yyyy/mm/dd/hh/mm/ss> " part of the CheckFile line. Example 2:CheckFile=<CLIENTFOLDER>\anyfile.dll<Version=2.0.0.0>The script section will be processed if the specified file does not exist on the users PC, if a version number cannot be successfully extracted from the file, or if the version number of the file on the user's PC is older than the version specified in the CheckFile line. The Software Update Wizard compares the version numbers from left to right as separate integers. Therefore version 2.0.0.0 is deemed newer than version 1.999.999.999.999. Example 3:CheckFile=<CLIENTFOLDER>\anyfile.dll<Version=2.0.0.0><Date=2004/12/01/23/00/00>
Example 4:CheckFile=<CLIENTFOLDER>\anyfile.dll<Version=2.0.0.0>
Example 5:
CheckFile=<CLIENTFOLDER>\anyfile.dll<Version=2.0.0.0>
CheckFileExists=<CLIENTFOLDER>\anyfile.dll
The script section will be processed if the file anyfile.dll exists in the specified folder on the user's computer and if the version of anyfile.dll on the user's computer is older than that specified in the CheckFile line. If anyfile.dll does not already exist in the specified folder then the update section will not be processed. Example 6:
CheckFile=<CLIENTFOLDER>\anyfile.dll<Version=2.0>
CheckFileExists=<CLIENTFOLDER>\anyfile.dll
This script section will cause an update to be processed if the version of anyfile.dll is earlier than 2.0.0.0. The <Version=2.0> in the script means only the first 2 components of the standard 4 component version string (i.e. nn.nn.nn.nn) are evaluated versus the version of the file on the user's PC. Notes:
When ActionedPrior to downloading the file specified in the Filename or Zipfile keyword lines. DefaultThis keyword is optional. |
||||||
| CheckFileExists= |
DescriptionThis keyword lets you determine whether the script update script should be processed, based on whether one or more specified files already exist on the user's PC. The update section will only be processed if all the specified files already exist. In addition, the optional "<NOT> " syntax causes the reverse to occur - an update is only processed if the specified file is NOT present on the target computer. This condition is evaluated on an AND, AND, AND basis with CheckFile, FileVersion, FileDate and FileMD5 keywords - i.e. all the tests need to pass in order for the update relating to the current script section to be processed. If any single test fails the section will not be processed. (Please see here for a summary of the Software Update Wizard™'s logic for determining if an update is required.) Example 1:CheckFileExists=<CLIENTFOLDER>\mydll.dllThe section will only be processed if mydll.dll exists in the same folder as the <CLIENTFOLDER> Software Update Wizard constant expands to. (See ExecBefore= for a list of Software Update Wizard constants.) Example 2:CheckFileExists=<CLIENTFOLDER>\mydll.dll The section will only be processed if both files exist on the user's computer. Example 3:CheckFileExists=<NOT><CLIENTFOLDER>\mydll.dll
The section will only be processed if mydll.dll is NOT present on the target computer and is licence.txt is present. Note: You may use the SubmitVariable keyword to substitute paths in the CheckFile line from text strings in the registry - see SubmitVariable. When ActionedPrior to downloading the file specified in the Filename or Zipfile keyword lines. DefaultThis keyword is optional. |
||||||
| Prerequisite= |
DescriptionUse this keyword to trigger an update only if a specified file exists. If a "<Version=...>" fragment is appended it also checks that the specified file is the same version or newer than the version specified in keyword line. Works with CheckFileExists, CheckFile, FileMD5 and FileVersion keywords on an AND, AND, AND basis - i.e. all the conditions need to be met to trigger an update.ExampleSubmitVariable
<NET4FULLINSTALLPATH>=HKEY_LOCAL_MACHINE\SOFTWARE\Microsoft\NET
Framework Setup\NDP\v4\Full\InstallPath Prerequisite=<NET4FULLINSTALLPATH>\mscorlib.dll<Version=4.7.2.0> The SubmitVariable line extracts the V4 .Net install path into a Software Update Wizard variable. The Prerequisite line checks that the .Net dll mscorlib.dll can be found and is the same or newer that the version specified in the "Version=" fragment. When ActionedPrior to downloading the file specified in the Filename or Zipfile keyword lines. DefaultThis keyword is optional. |
||||||
DescriptionA message which will appear on the client PC, prior to the download being actioned. The message text in this keyword must be a single line of html or a URL, where the "http://" part is required. The html or URL will be rendered by the Internet Explorer web control.  More.. More.. You can use the constant "<USERNAME>" in your message to provide some degree of personalization to the message - the name of the logged on user will be substituted for "<USERNAME>" when the message box appears. You can suppress the web control scroll bar using the "scroll=no" attribute syntax for the <body> tag, as in: <body scroll="no">This web browser control has no scroll bar!</body>
Therefore the following line generates the message box seen immediately below: Message=<body scroll="no">Hello <USERNAME>!<p>There is an <i>absolutely fabulous</i> new version of MyApp available!<p>Would you like to download and install it now?</body>
Note that there is a special case scenario where you may wish to advise your users if there is actually no new update applicable to them. This situation is described in the FAQ - click here for more information. The Message= keyword is optional. The 'Yes' and 'No' buttons will appear if there is an Importance=Optional keyword line within the section being processed. If there is no " Importance=Optional " keyword line then the dialog box will just have an 'OK' button. If you use the <AllowPostpone> option in the Importance= line as described below there will be 3 buttons on the message box: The 'Options..' button allows your user to decline the update this time but to specify a date on or after which they will again be prompted for the update (assuming it is still in the update script at that time):
If the user selects 'No' on the message box the update will not be processed this time. However, assuming the section is still in the script next time an update check is made, they will again be offered the update, unless you also use the Permanent option in your Importance= line. Note that the following (case-sensitive) 'tags' may be used in the html used to drive the web control on the dialogs:
You may use these tags in combination. You can put them anywhere in your html - the Software Update Wizard will identify and remove them from the rendered html. See also:
When ActionedAfter the update script file has been downloaded from the server and checked against the counter variable, but before any update files are downloaded. DefaultIf no message is provided then the update will
happen automatically, ( irrespective of the information in the
Importance= keyword). |
|||||||
DescriptionProvides a template that all message boxes displayed by the Software Update Wizard will use (i.e. via Message, FinalMessage or any of the informational messages posted through the update process). The template uses any standard html. Insert the text '[!Content!]' into the place in the template text where the individual message should go. Example:
<body scroll="no" style="border:0px;">[!Content!]</body>This simple template causes the message boxes displayed by the Software Update Wizard to be displayed without the default vertical scroll bar and without the border between the web browser control and the dialog window that contains it. When the Software Update Wizard needs to display a message the specified text is inserted into the template to replace the text "[!Content!]". Note that the constant "[!Content!]" is case sensitive and must be provided. When ActionedThis keyword is actioned when the update script is first parsed and will persist through further update script sections within the same script file until it is changed by a subsequent script section. DefaultIf this optional keyword is not used then the default message box style will be used. |
|||||||
DescriptionLets you control whether the update is compulsory for all users or optional. If it is optional the user will be given the opportunity to accept or reject the update, based on the text you supply on a Message= keyword line within the script section being processed. Example:Importance=Optional
There is an additional syntax option, which lets you skip not only the current script section, but also one or more script sections which follow the current section, when the user declines the update proposed in the 'Message=' keyword line. For example:
If the user clicks the 'No' button in response to the message displayed through processing section [3] then the<Else[5]> part of the keyword line will cause the script to completely skip section [4] and start processing section [5]. In the above example, section [5] is optional too. Therefore:
Therefore, in the above example, declining update [3] will cause it to be re-offered to the user next time, unless section [5] is accepted and successfully updated. As a further permutation, you can make the effect of having declined an update permanent, so that the user is never prompted again for that update irrespective of any following interaction with the Software Update Wizard. For example:
In this example,
section [3] is still optional, but if
the user answers 'no' when the dialog box offering the update appears
then the Software Update Wizard counter will be permanently updated with
the result that this section will never
be processed again. The first possible
section to be processed in this or any
future Software Update Wizard run will be (in the example shown above)
section [5]. DefaultThe default for updates is compulsory.
To make an update optional you must include the line 'Importance=Optional'
and provide a Message= line. |
|||||||
DescriptionIf Yes then the target file is renamed with a *.bak file extension, otherwise it is overwritten by the update. Example:Backup=YesThis keyword is optional and applies only to files updated as a result of a Filename= keyword within the script section. When ActionedAfter the updated version of the target file has been downloaded but before the existing file is overwritten. DefaultNo backup will be made. |
|||||||
DescriptionLets you specify the target folder into which the updated file will be downloaded. You can use any of the Software Update Wizard folder expansion constants in this keyword. If the target folder does not exist, the Software Update Wizard will create it. Examples: TargetFolder=<WINDIR> DefaultIf no TargetFolder line is provided, the updated file will be downloaded into the same folder as the application hosting the Software Update Wizard dll or the wuwstub.exe program. A Note about UNCsA TargetFolder can be a UNC (Universal Naming Convention) path. The UNC must be in the format: TargetFolder=\\Servername\folder1\folder2 |
|||||||
DescriptionNote: this keyword has been retained for backward
compatibility. We recommend that you use the
KillProcess keyword to automate the closing
and restarting of your application during an update. Please be
aware that WindowTitle only checks and closes windows running in the
same security context as the Software Update Wizard service
application - normally SYSTEM.
KillProcess is able to close and restart
applications running in any security
context and is the recommended replacement for WindowTitle.
However, if you absolutely need to be able to close a window based on its title text then you can use the following ExecBefore line: ExecBefore=Powershell Get-Process | Where-Object { $_.MainWindowTitle -like 'National*' } | Stop-Process<AsUser><SW_HIDE> This line will cause all windows containing the wildcard text 'National*' to be closed. The '<AsUser>' Software Update Wizard flag causes the process to run in the context of the currently logged in user. Windows does not permit the replacement of in-use files. Therefore if your application needs to update itself it needs to be closed by the Software Update Wizard. This keyword will send a Windows WM_CLOSE message to each application containing the text you specify in its application title bar (see examples below). If the application does not close (i.e. respond to the WM_CLOSE by terminating) within the default time of 5 seconds then it will be forcibly terminated by the Software Update Wizard. You can override the timeout interval by appending <Timeout=xxx> to the keyword line, wherexxx is the number of milliseconds between issuing the WM_CLOSE message and the application being forcibly terminated by the Software Update Wizard. Note that forcible termination means that the user will lose any changed data in the application that is being terminated. A well-behaved application should respond to the WM_CLOSE message and allow the user to save their data before closing. This means that your timeout interval must be long enough to allow all changes to be saved before the application is forcibly terminated. (Tip: If your application saves any unsaved changes before issuing a call to the Software Update Wizard it will be able to close in response to the Software Update Wizard's WM_CLOSE message without further user intervention.) If you append the text <NOWARN> to this keyword line then running instances will be closed without the user being prompted. Otherwise the user will be advised that the Software Update Wizard would like to close the specified application. In instances where the user is likely to need to save data before the application closes it therefore makes sense to allow the warning message to be posted. The target application will not be forcibly closed while the warning message box is displayed. The WM_CLOSE message will be issued as soon as the warning message box is dismissed If the application is still open after the WM_CLOSE timeout it will be legitimately forcibly closed by the Software Update Wizard. To summarise, the sequence is:
Examples:WindowTitle=Notepad The first example posts a warning message that Notepad will be closed down, and then closes it down. If there is unsaved data in Notepad then it waits the default 5 seconds before terminating without saving. The second example closes Notepad without any warnings. If there is unsaved data then the user will have 5 seconds to save it before it is forcibly closed. The third example does the same as the second, except that the user has 15000 milliseconds (i.e. 15 seconds) to save any unsaved work before Notepad is forcibly terminated. Be aware that if you are using Software Update Wizard to update a dll file, for example, you will need to ensure that all applications which are using that dll are closed, using multiple occurrences of the WindowTitle= keyword line. Restarting Applications that have Been ClosedIf you have used the Filename= keyword in your script then the Software Update Wizard will attempt to relaunch the applications closed by this keyword after the download and all the ExecAfter= keywords have been executed. It will not do this for a Zipfile= type update. In this instance you must use a specific ExecAfter= command to relaunch your application. For example: [1]
This is what happens when the above update file is processed:
DefaultThis keyword is optional. If not included in a section, no applications will be closed by Software Update Wizard. If the file that is being updated is in use by Windows then Software Update Wizard will report a file in use error to the user. (You should not let this happen!) See also MoveFileEx= and Reboot keywords for how to replace in-use files. See AlsoThe KillProcess keyword offers a similar mechanism for closing running applications. For technical reasons PowerProgrammer recommends using KillProcess in preference to WindowTitle. (KillProcess was added in Version 3.0 of the Software Update Wizard, but WindowTitle was retained for backward compatibility.) |
|||||||
| KillProcess= |
DescriptionWindows does not permit the replacement of in-use files. Therefore if your application needs to update itself it needs to be closed by the Software Update Wizard. Once the application file has been updated by the Software Update Wizard it then needs to be restarted. This keyword handles the whole process - closing the specified applications before the update and restarting them after the update. In addition, it is possible to have KillProcess close the specified applications but to not automatically restart them using an optional flag described below. This keyword is a more recent alternative method to WindowTitle= for closing a running application. It allows you to specify the filename of the in-use application rather than the text contained in its title bar. When you use this keyword, all running instances of the specified filename will be terminated. The Software Update Wizard initially sends a WM_CLOSE message to the window of the target application (if it finds one). This should cause the target application to ask the user to save any outstanding changes. A default of 5 seconds later the application will be terminated. (Alternatively, your application could auto-save / prompt the user to save changes before the call to the Software Update Wizard is made.) If the application does not respond to the WM_CLOSE method within the timeout period the Software Update Wizard will forcibly close it using the Windows TerminateProcess() API. You can provide a longer timeout by appending a timeout in milliseconds to the KillProcess line: KillProcess=MyApp.exe<Timeout=10000>The example above waits for 10 seconds before terminating MyApp.exe. By default, the Software Update Wizard will post a message box warning the user that the application will be closed for updating and the application will not be closed until the user has dismissed the message box. You can suppress the display of this message box by appending <nowarn> to the KillProcess line, as in: KillProcess=MyApp.exe<Timeout=10000><nowarn>The default behaviour of KillProcess is to automatically restart the specified applications. However, if you would prefer not to restart an application which KillProcess has closed (e.g. you need to pass command line arguments to restart the process correctly) then you can append the "<norestart>" option to your keyword line. The Software Update Wizard will then close the application if it is running but will not try to restart it after the update process has completed. If you need to restart your application using command line arguments then you would use the ExecAfter keyword line. For example: [7] KillProcess provides a more effective method for the applications which were terminated to be restarted after the update has taken place and we recommend using KillProcess wherever possible, in preference to WindowTitle=. You can provide multiple KillProcess lines within a single script section. To terminate all instances of MyApp.exe and MyOtherApp.exe prior to updating, you would include the following keyword lines: [7] Remember that if you are replacing dll files used by your application you will have to apply KillProcess to all the applications which depend on the dll files being replaced. See also:You can execute any number of external processes immediately after the process(es) specified in the 'KillProcess' keyword line(s) using one or more ExecAfterKillProcess= keyword lines. SummaryTo summarise, this is what happens when the Software Update Wizard finds a KillProcess line in a script section:
DefaultThis keyword is optional. If not included in a section, no applications will be closed by Software Update Wizard. If the Software Update Wizard finds it is unable to replace an in-use file with one it has downloaded it will post a message box asking the user to close the file. The message box will be repeated until the file is free to be updated. To avoid the possibility of infinite loops (because, for some reason, the user is unable to close the in-use file), you should always use KillProcess in your update scripts, unless you are totally convinced it is unnecessary. |
||||||
| ExecBefore= |
DescriptionLets you launch a process on the machine running the Software Update Wizard prior to the target files being updated. Also supports launching Windows Powershell scripts. Multiple ExecBefore= keyword lines are permitted within a single script update section . The ExecBefore= processes are launched in the order in which they appear in the update script. Note that the scope of this command is the context of an individual Script section. Therefore, if you have 2 sections, each with its own 'ExecBefore=' keyword line, then each 'ExecBefore=' will be processed as part of the section. You may pass any number of command line arguments to an 'ExecBefore=' command. The following rules allow Software Update Wizard to separate the arguments from the filename:
Folder ConstantsYou can use the Software Update Wizard folder expansion constants in 'ExecBefore=' command lines: Therefore, for example, the command ExecBefore="<WINDIR>\notepad.exe" will be expanded to either C:\WinXP\notepad.exe or C:\Windows\notepad.exe depending on the version of Windows the user is running. Launch and continue, or launch and wait till launched process has completedYou can control whether the script should pause until the launched process terminates or continue execution immediately after launching the process. If you want the script to pause until the launched process terminates, you should append the text <Wait=Yes> to the end of the command, as shown below: ExecBefore=c:\WinNT\Notepad.exe readthis.txt<Wait=Yes> Using Long File NamesIf the path contains long file names which contain spaces, you must remember to enclose it in double inverted characters. For example, say your ExecBefore command is: ExecBefore=<CLIENTFOLDER>\MyApp.exeIf <CLIENTFOLDER> expands to, for exampleC:\Program Files\MyAppFolder then the above syntax will fail. The correct syntax is: ExecBefore="<CLIENTFOLDER>\MyApp.exe"In other words, use the same syntax as you would using the Windows 'Start' -> 'Run' dialog box. Only execute for specified Windows VersionYou can (optionally) specify which versions of Windows the command will be launched for, using either <MaxVer= x,x,x> or <MinVer= x.x,x> in the ExecAfter/ExecBefore keyword line. If the version of Windows on the Client machine passes the MaxVer/MinVer test the command will be run, otherwise it will be ignored. If you use neither MaxVer nor MinVer then the command will always be run. The " x,x,x" part of the syntax corresponds to values for the following items:
The possible values are listed here. For example, the following command will only be run for Windows Vista or later platforms: ExecBefore=wuwNTClient.exe<MinVer=2,6,0> The following command will only run on Windows 98ME platforms: ExecBefore=setup.exe<MaxVer=1,4,90> Suppress command windowIf you are using this keyword to execute a console command (e.g. to run a DOS command) then you can suppress the display of the command window using the "<SW_HIDE>" flag:
Running Windows Powershell ScriptsYou can run Windows Powershell scripts or commands from an ExecBefore or ExecAfter. You can execute a single command, a script file via a file and path on the user's computer or a script file url. If the host computer does not have Powershell installed (e.g. Windows XP) then the ExecBefore/ExecAfter will be ignored. The default execution policy for Powershell is 'Restricted' on most computers. This prevents all Powershell scripts or commands from being executed. However, the Software Update Wizard uses the elevated status of the Software Update Wizard service to temporarily set the host's execution policy to unrestricted for the duration of the execution of the Powershell script in the ExecBefore\ExecAfter. It then resets it to whatever it was prior to the ExecBefore/ExecAfter on completion. This is as secure as it possibly can be. However, if the limited time that Powershell scripts can be run is not acceptable to you then unfortunately you won't be able to use this Software Update Wizard feature. The syntax for each type of Powershell command source is as follows:
Security NotesNote that the security context of the processes launched will be as follows: WebUpdateSvc4.exe as Windows Service:Because the Software Update Wizard Service runs in the SYSTEM security context, the default behaviour of ExecBefore / ExecAfter is to launch the specified processes in the SYSTEM context also. However, if you append <AsUser> to the keyword line the process will then be launched in the context of the logged on user - for example: ExecBefore="<CLIENTFOLDER>\MyApp.exe"<AsUser>WebUpdateSvc4.exe as standard Windows executable application The processes will inherit the logged on user's rights. When ActionedAfter the updated file is downloaded but before the existing files are updated. If you use the MD5= keyword but the downloaded file fails its MD5 integrity check the processes specified in the ExecBefore= keyword lines will not be executed. DefaultIf not included in a section then no processes will be launched.The script continues without waiting for the process launched by an ExecBefore command to finish. If you want the script to pause until the launched process terminates, you should append the text <Wait=Yes> to the end of the command, as shown here:
|
||||||
| ExecAfterKillProcess= |
Description'ExecAfterKillProcess=' is exactly the same as 'ExecBefore=' except that it executes immediately after the processes specified in 'KillProcess=' have been terminated. Remember to use the '<Wait=Yes>' option to ensure that the specified process(es) have finished executing if any subsequent steps in your update script depend on completion of the ExecAfterKillProcess= step. When ActionedImmediately after the processes specified in 'KillProcess=' have been terminated. DefaultNo processes will be executed if not included in the section. |
||||||
| ExecAfter= |
Description'ExecAfter=' is exactly the same as 'ExecBefore=' except that it executes as the last process of a section, rather than the first. Therefore, the same folder constants, operating system filters, wait flag, security context and Powershell script execution options apply. (See 'ExecBefore=' above for full documentation of all the options available from the ExecAfter keyword.) This keyword is particularly useful if, say, the file that is being handled
within the section is an installation program containing your updated software.
Please read the keyword help for ExecBefore in the preceding section before proceeding. More information:Note that there is a special situation where an addition to the ExecAfter syntax is required. The Software Update Wizard's counter is incremented once all the keyword lines in a section have been successfully executed. Suppose you launch an installation program in your ExecAfter, with a<Wait=Yes> flag. The Software Update Wizard will launch the installation program and will wait until that process has finished before continuing (and incrementing the counter). But what if the installation program triggers a reboot? In this instance, the counter will never be incremented. To address this situation, you should use the<BlockDone> flag. When this flag is used in combination with<Wait=Yes> the Software Update Wizard counter will be incremented before the install program is launched. The syntax in full for this situation would therefore be: ExecAfter="<CLIENTFOLDER>\setup.exe"<Wait=Yes><BlockDone>Here are some more syntax examples: ExecAfter=<WINDIR>\notepad.exe G:\TEMP\demo_SQL.txt<AsUser>The example above launches the file g:\temp\demo_SQL.txt into Windows Notepad in the user's system security context. (Important: If you are running the Software Update Wizard as a service application you should always remember to use the <AsUser> option because Windows Vista or later will intercept any attempts by a service application, or processes launched from a service application, from interacting with the user. The <AsUser> flag causes the launched process to be launched in the security context of the logged on user. Therefore no security warnings will be posted by Windows - the desired user experience.) ExecAfter="G:\TEMP\Long folder\my app.exe" "Peter Boulton" admin UK<AsUser>This example shows the correct approach to long file names and command line arguments. The path to the executable is enclosed by double inverted commas. If a command line argument has spaces it too should be enclosed by double inverted commas. If you use <Wait=Yes> to wait on completion of the launched process you can also test its exit code with the additional option flag <QuitOnFail>. This option uses the standard exit code convention where '0' represents successful completion of the launched process and any other return code is interpreted as failure. Therefore if a non-zero exit code is received from the launched process this option causes the rest of the update process to be abandoned - effectively terminating the update process and a message to be written to the WebUpdateSvc4.log file. As the target application will not have been updated then the next update check will attempt to perform the whole update again. A typical scenario for using the <QuitOnFail> option is where you use an ExecAfter to launch an installer. Say the user cancels out of the installer, causing it to exit with a non-zero exit code. In that instance, you would not want an update success message box to be shown and you would not want any further update script keywords to be actioned. Important Information on Launching Installers from Software Update Wizard scriptsSome Software Update Wizard users prefer to use the Software Update Wizard to deliver their software updates in standard Windows installers using a 'Filename=http://www.mycomany.com/setup.exe' type keyword line to download the installer and to then launch the installer using an ExecAfter. This method is fully supported by the Software Update Wizard, within the security constraints of the Windows operating system.However, an issue arises when the installer is launched using the security context of the Software Update Wizard service application, SYSTEM. Microsoft has prevented service applications from interacting with the user's desktop since Vista because it is a security loophole. Therefore, if you launch an installer (or any other application that has a user interface) from a Windows service, Windows will normally intercept it and post an 'Interactive Services Dialog' or task bar notification. The user has to 'notice' this, agree to action it, go to a separate desktop that opens, run the interactive application and then close the separate desktop. This is very far from ideal in a software update context and ideally needs to be avoided. The only way to avoid the 'Interactive Services Dialog' / notification is via one of the following routes:
Please bear in mind that this issue is caused by Windows security policy. The Software Update Wizard or any other alternative automatic updates solution cannot circumvent the way Windows works in this respect (nor should it be able to, as this would constitute a serious security vulnerability in Windows). Therefore, whichever auto-updates software solution you use will have to operate in one of the three ways described in this section. When ActionedAfter the update file has been downloaded. DefaultAs 'ExecBefore=' |
||||||
| DelTree= |
DescriptionThis keyword lets you recursively delete a folder structure, much like the (old) DOS command, deltree. It will delete all the files and folders within the specified folder path, including the specified folder itself, including files that have the read-only or system attributes set. However, it will fail to completely delete the tree structure if any of the files within it are open and in use.You can use any of the Software Update Wizard folder substitution tags in a DelTree keyword line. ExampleDelTree=<CLIENTFOLDER>\somefolderThis keyword line will deletesomefolder and all folders beneath. It will be executed after the ExecAfter commands have been launched. If you prefer the DelTree to be executed at the start of the update process, immediately after the ExecBefore commands have been launched, append the tag <Before> to the keyword line, as shown in the next example: DelTree=<CLIENTFOLDER>\somefolder<Before>The <FilesOnly> option flag allows you to use this keyword to recursively delete all the files in the specified tree whilst leaving the folder structure intact: DelTree=<CLIENTFOLDER>\somefolder<Before><FilesOnly>The <FilesOnly> option flag in the example line above causes only the files within the nested folder structure to be deleted, retaining the full folder structure. When ActionedIf you do not use the <Before> tag then the folder tree will be deleted immediately after any ExecAfter keyword lines and before any KillProcess lines. (See also DelTreeAfterKillProcess to execute after processes have been killed). If you use the <Before> tag then the folder tree will be deleted immediately after any ExecBefore keyword lines.Default - if not usedNo folders or files will be deleted! |
||||||
| DelTreeAfterKillProcess= |
DescriptionThis keyword performs the same function as DelTree <CLIENTFOLDER>\somefolder<Before> except that it is executed immediately after all the KillProcess lines in the update script have killed the specified processes and before the update process begins.The <FilesOnly> option flag performs exactly as in DelTree and allows you to use this keyword to recursively delete all the files in the specified tree whilst leaving the folder structure intact. When ActionedAfter KillProcess and before the file update in the script is made.Default - if not usedNo folders or files will be deleted! |
||||||
| SetReg |
DescriptionAllows you to set a registry key value. If the key does not already exist it will be created. You can limit the action to 32-bit Windows, 64-bit Windows or either, as described below. You can perform registry operation using either the security context of the Software Update Wizard service (e.g. to update a registry key the logged on user does not have rights to) or using the security context of the logged on user (e.g. to update a setting under the user's HKEY_CURRENT_USER branch). You can include any number of SetReg lines in a single update script section.ExampleThis SetReg shows the minimum required syntax to create / write the value '17' to a registry key whose data type is type REG_DWORD:SetReg=HKEY_LOCAL_MACHINE|Software\Data Perceptions\Prophecy\Prophecy for Windows\Advisor|NewKey|17 Note that the syntax breaks the statement down into separate fields, delineated by '|' (ascii 124) characters (highlighted yellow in the example syntax above). The fields are:
Writing to a REG_SZ type registry value data field is identical to REG_DWORD but you must enclose the required text in quotes: SetReg=HKEY_LOCAL_MACHINE|Software\Data Perceptions\Prophecy\Prophecy for Windows\Advisor|NewTextKey|"A textual field" The '<AsUser>' FlagThe preceding examples will all be executed in the security context of the Software Update Wizard service application (assuming you are running as a service) - i.e. SYSTEM. This is ideal for writing to HKEY_LOCAL_MACHINE even if the logged on user does not have rights to write there.However, if you use the same syntax as above to write to HKEY_CURRENT_USER you will find that the command succeeds but writes to the HKEY_CURRENT_USER associated with SYSTEM, the security context the Software Update Wizard service runs in. To update the logged on user's HKEY_CURRENT_USER you must include the "<AsUser>" option flag: SetReg=<AsUser>HKEY_LOCAL_MACHINE|Software\Data Perceptions\Prophecy\Prophecy for Windows\Advisor|NewKey|17 64 Bit / 32 Bit FilteringBy default, the SetReg feature writes the specified key/value irrespective of whether it is running on a 32 bit or 64 bit host.However, you can constrain the operation to either 32 bit only or only 64 bit only hosts using the optional flags '<32bit>' and '<64bit>'. If your SetReg contains neither option flags it will be executed on 32 bit and 64 bit hosts. If it contains just the '<32bit>' flag it will only be executed on 32 bit hosts. If it contains just the '<64bit>' flag it will only be executed on 64 bit hosts. The following SetReg will be executed for 64 bit platforms only: SetReg=<64bit>HKEY_LOCAL_MACHINE|SOFTWARE\Wow6432Node\Microsoft\Windows\CurrentVersion\Uninstall\Software Update Wizard (Redist)|DisplayVersion|5.2 The following SetReg will only be executed for 32 bit platforms: SetReg=<32bit>HKEY_LOCAL_MACHINE|SOFTWARE\Microsoft\Windows\CurrentVersion\Uninstall\Software Update Wizard (Redist)|DisplayVersion|5.2 When ActionedAfter all ExecAfter commands have been launched and before the final success message (if used) is displayed.Default - if not usedNo registry changes will be made! |
||||||
| SubmitVariable |
DescriptionUsed to declare lookup variables to registry strings, which are then substituted for the variables in CheckFile, CheckFileExists, ExecAfter, ExecBefore, SubmitForm and TargetFolder keywords.This keyword is explained in more detail here. |
||||||
| SubmitForm= |
DescriptionThe Software Update Wizard can generate an (optional) http: GET or POST request to a web server, as if the information had submitted from an html form on a web page. This powerful feature allows you, the software developer, to transparently receive confirmation that your customers have successfully updated their software using the Software Update Wizard. Please follow this link for further information.When ActionedAfter the update file has been downloaded and the ExecAfter commands have been launched. DefaultThis is an optional keyword line. If you do not use it no information
will be transmitted by the Software Update Wizard. |
||||||
| NoSuccessMessage |
DescriptionSuppresses the display of the automatic Software Update Wizard download success message box.However, if you are supplying a FinalMessage= override in your script then this keyword has no effect. That is, it only suppresses the default success message box. Example:NoSuccessMessage DefaultA default success message will be generated. |
||||||
| FinalMessage= |
DescriptionLets you provide your own text to be displayed in a Software Update Wizard message box, after all the keyword lines (except 'Reboot') have been processed for the update file section.See Message= for an example of the syntax used - just substitute FinalMessage= for Message=. When ActionedAfter all the keyword lines (except 'Reboot') have been processed DefaultThe standard download success message will be displayed, unless you also
use the ' NoSuccessMessage= ' keyword.
|
||||||
| MoveFileEx= |
DescriptionThe Software Update Wizard offers two options for addressing the issue of replacing in-use files (i.e. files which are in use by Windows and therefore cannot be updated):
ExampleMoveFileEx=From=<CLIENTFOLDER>\MyApp.ex_|To=<CLIENTFOLDER>\MyApp.exe
As you can see, you can use the same constants as for the ExecBefore / ExecAfter keywords. TheFrom part is the downloaded updated file and theTo part is the existing file. The From and To elements are separated by a '|' character. Each script section may have as many MoveFileEx lines as required. The way in which locked files are updated differs between Windows 9x platforms and NT based platforms. The Software Update Wizard will determine which operating system it is running on and take the appropriate action:
When ActionedAfter the ExecAfter commands have been completed and before the SubmitForm command. DefaultThis is an optional keyword. If you do not use it then no file
updates will be actioned for the next reboot. |
||||||
| Reboot |
DescriptionPrompts the user and then reboots the PC if the user clicks the 'Yes' button:
Example 1This example causes a prompted reboot. Reboot Example 2This example causes an automatic (i.e. unprompted) reboot: Reboot<nowarn> When ActionedAfter all the other keywords in the script section have been interpreted and actioned. DefaultNo reboot will occur |
||||||
| CampaignManager= |
DescriptionLets you launch a Campaign Manager script from within an update script section. The Software Update Wizard can be used either for campaign management, or for updating software via the web. However, in a situation where both features are required and need to be launched sequentially from your application you should use this keyword, rather than 2 successive calls to the Software Update Wizard from your software. Why? For the following reasons:
When ActionedYou have 3 options to control the point at which the Campaign Manager script is launched, as demonstrated in the following examples:Example 1: Before the specified update block gets processed[7] The campaign script will only be launched if the user has not previously updated via section [7]. If the user has already received the update in section [7] the campaign script will not be launched. This option gives you the opportunity to launch different campaign scripts from different script sections. Note that<Before> is the default option for this keyword. If you omit<Before> or<After> from the keyword line then<Before> will be used. Example 2: After the specified update section gets processed[7] Example 3: Always launch the campaign script, even if no updates are requiredAs explained in the FAQ section, it is possible to post a message box confirming that the user's software is already up to date and that no updates are required this time, by posting script section at the bottom of your update script with a 'Message=' keyword line.If you also add a CampaignManager= line to this section then the campaign script will be launched each time the server script is run, irrespective of whether any updates are required, as shown in the following example: [99999] [99999] DefaultNo campaign script will be launched. |
||||||
| Group= |
DescriptionThis keyword is used in 2-pass update scripts and allows you to link an update section to a named group of updates. When the controlling application for the 2-pass update parses the XML file which the first pass generates it can then specify which update groups should be processed in the second pass. (Please see the help topic 2-Pass Updates.)A Group name can be any alphanumeric text value. ExampleGroup=dllupdates2DefaultIf you are using 2-pass updates then this keyword is required. If you omit it the section with be ignored and will not be included in the generated XML file.If you use this keyword in single-pass updates it will simply be ignored. |
||||||
| Priority= |
DescriptionThis keyword is used in 2-pass update scripts and allows you to assign a numeric priority value to the update section in which the keyword line resides. It is not used by the Software Update Wizard, but is included in the XML file generated by the first pass scan. Your application can then parse the XML file and decide which updates need to be processed based on their priority, if that is what you want your application to be able to do. Otherwise, your application can ignore the priority tag.ExamplePriority=5DefaultThe Priority tag in the XML file generated by the first pass will be -1. If you use this keyword in single-pass updates it will simply be ignored. |
||||||
| ShortMessage= |
DescriptionThis keyword is used in 2-pass update scripts and allows you to specify the short message which will be written to the XML file if the section in which it resides needs to be processed in the second pass. It allows your controlling application to pick up a short description of the update to present to the user.ExampleShortMessage=Updates for Printing ComponentDefaultIf you do not include a ShortMessage line in a 2-pass update script section then the ShortMessage tag in the XML file generated in the first pass by the Software Update Wizard will be blank (empty).The line will be ignored if you include it in a single pass update script. |
||||||
| LongMessage= |
DescriptionThis keyword is used in 2-pass update scripts and allows you to specify the long message which will be written to the XML file if the section in which it resides needs to be processed in the second pass. It allows your controlling application to pick up a long description of the update to present to the user.All other properties and behaviours are as ShortMessage |
||||||
| XML_FileVersion= |
DescriptionThis keyword is used in 2-pass update scripts and allows you to add a file version tag for any file on the user's computer to the XML file of available updates which is generated by the first pass.Note that the tag will only be added to the generated XML file in the first pass if an update is actually applicable. You can include any number of XML_FileVersion lines in an update script section. You may use any of the Software Update Wizard's folder substitution variables. (See TargetFolder.) If the file referred to in the XML_FileVersion keyword line exists on the target computer and it has a version string then the version string will be written to the generated XML file in a <FileVersion..> tag. If the file exists but it does not have a version string then the text "MissingVersionData" will be written to the <FileVersion..> tag. If the file does not exist then the text "NotFound" will be written to the <FileVersion..> tag. ExampleXML_FileVersion=<WINDIR>\NOTEPAD.EXE This keyword line will add the following tag to the generated XML file (providing an update is required from the script section in which the keyword line resides): <FileVersion Name="C:\Windows\NOTEPAD.EXE">6.0.6000.16386</FileVersion> DefaultThe XML file generated by pass 1 of the 2-pass process will not contain any <FileVersion> tags. |
||||||
| XML_Spare= |
DescriptionThis keyword is used in 2-pass update scripts and allows you to add any number of user-defined informational tags to the XML file which is generated by the first pass of the update script.You can use this option if the Group or Priority values for each update section are insufficient for your controlling application to determine which updates it would like the Software Update Wizard to process on the second pass or to help your controlling application with its interaction with the user. Note that the tag(s) resulting from using this keyword will only be added to the generated XML file in the first pass if an update is actually applicable. You can include any number of XML_Spare lines in an update script section. ExampleXML_Spare=<Dependency>OfficeUpdates</Dependency>This keyword line will add the following tag to the generated XML file (providing an update is required from the script section in which the keyword line resides): <Dependency>OfficeUpdates</Dependency> The text to the right of the '=' sign in the keyword line is simply added as a tag to the generated XML file. DefaultThe XML file generated by pass 1 of the 2-pass process will not contain any additional tags. |
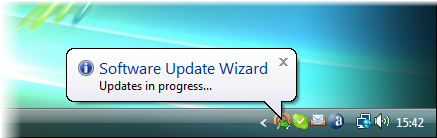

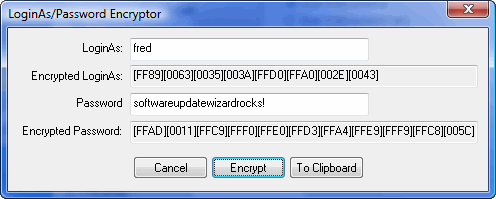
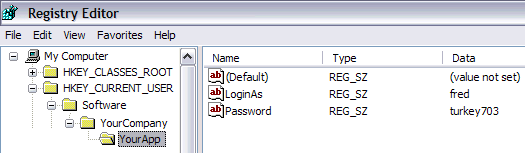
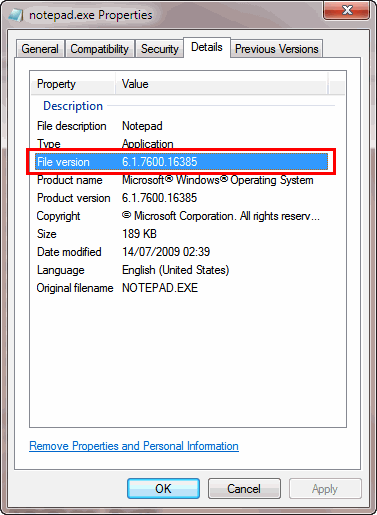


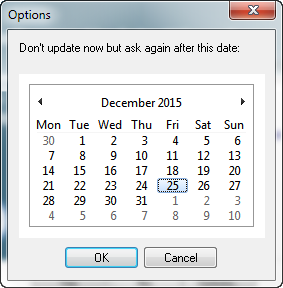
