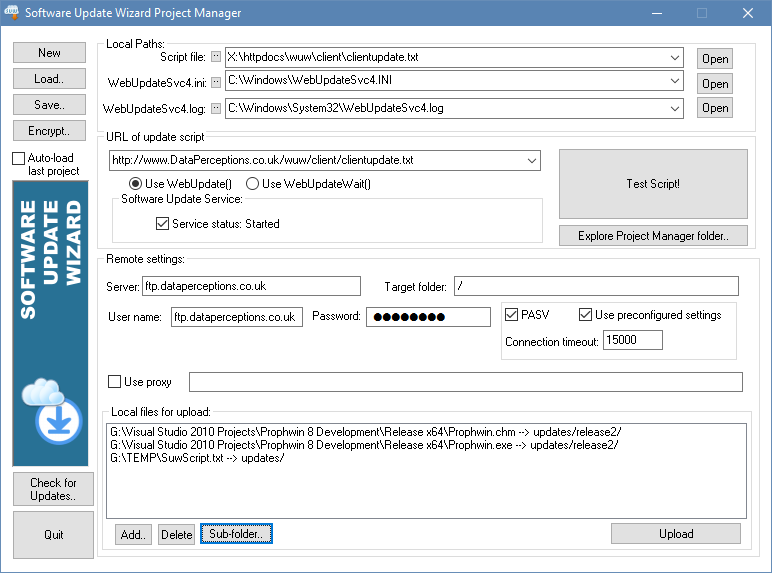
The Software Update Wizard Project Manager helps you prepare, test and upload your software updates and update scripts.
(Tip: Let your mouse hover over controls in the dialog image below for help on each control. The actual application also has popup 'tool tips' for each control when you let your mouse hover over them.)
When you are preparing and testing your update script, you will want to quickly view / edit the script, check the state of the WebUpdateSvc4.ini file to see the counter values, or the WebUpdateSvc4.log file to check the log file for errors.
The group panel labelled 'Local Paths:' lets you specify the paths of these files and then quickly open them for viewing / editing by clicking the 'Open' buttons.
Tip: If you enter the filenames of the script file, WebUpdateSvc4.ini and WebUpdateSvc4.log in the edit fields on the dialog then the files will open using the default Windows file associated application when you click the adjacent 'Open' button. If you want to open the file using a different editor, the edit fields also accept full command lines containing application and document path, as shown in the following example:
The 'Service status' checkbox shows whether the Software Update Wizard service is running. Uncheck the box to stop the service and check the box to start it.
Note that you need Administrator rights to start/stop a Windows service. If you do not have sufficient rights the checkbox will always be unchecked, even if the service is actually running.
To help you test your update script, you can use the controls in the group panel labelled 'URL of update script'. When you click the 'Test!' button the Software Update Wizard Project Manager does the following, simulating what will happen when the Software Update Wizard is launched from your application:
Tip: You may wish to use the Testmode keyword in your script block while testing scripts in order to save having to edit the WebUpdateSvc4.ini counter value each time you want to retest. (Just remember to remove the Testmode keyword if applicable, before you go live!)
Once you have authored and tested your script file you can use the group panel labelled 'Remote settings' to FTP the files to your web server.
You can add as many items to the 'Local files for upload:' list box. They will be uploaded sequentially when you click the 'Upload' button.
Make non-contiguous selections from the file list and click the 'Sub-folder..' button to specify a subfolder on the ftp server (beneath the folder specified in the 'Target folder' field) to upload the selected files to.
Note that each ftp operation result is appended to the file 'ftp.log' in the Software Update Wizard Project Manager application folder.
The 'Load' and 'Save' buttons let you save the settings from the Project Manager dialog controls to file. (The file format of Software Update Wizard Project files is XML.)
The keywords 'LoginAs' and 'Password' allow you to put your update files into a password protected folder on your web server.
It is possible to encrypt either the 'Hard coded' login/password or the registry keys used in these keywords, so that casual readers of your script are unable to read the LoginAs and Password lines. The Software Update Wizard Project Manager utility has an 'Encrypt..' button. When you click it you will be able to encrypt the login and passwords for the update files folder on your web server:
You enter the LoginAs / Password into the edit fields. The 'Encrypt' button then encrypts them. The 'To Clipboard' button copies the correct syntax for the encrypted LoginAs/Password keyword lines to the Windows clipboard, ready for you to paste into your update script. The pasted text, based on the dialog screenshot is:
LoginAs=>><[FF89][0063][0035][003A][FFD0][FFA0][002E][0043]
Password=>><[FFAD][0011][FFC9][FFF0][FFE0][FFD3][FFA4][FFE9][FFF9][FFC8][005C][002C][0009][FFDF][0024][004C][004D][FFD3][FFFE][FFBF][004D][000A][FFAB][FFE8][0067][FFEF][FFBC][001B][0058][FFC5][0078][004C]
Click the button labelled 'Check for Updates' to initiate an updates check to the PowerProgrammer website. If there is a new version of the Software Update Wizard available for download you will be advised and offered the opportunity to have it downloaded and installed for you.
Note: This feature is only available to registered users.
When you purchase a copy of the Software Update Wizard from our web site you can register it using the Software Update Wizard Project Manager, as described here.
Your software purchase entitles you to one year of free updates and product support. Thereafter you can purchase an annual support arrangement which continues updates and support for a further 12 months.
The process for renewing support is described here.
Type 'WhatsMySerial' into the url field on the Software Update Wizard Project Manager and click the 'Test Script!' button. A window will appear with your original serial number.
Type 'CheckSupportExpiry' into the url field on the Software Update Wizard Project Manager and click the 'Test Script!' button. A window will appear displaying your support data. (Note: an internet connection is required to use this feature.)