Using the Software Update Wizard - Example
Auto-updates with 1 line of code!
Step 1: Create your update script
Once you have integrated the Software Update Wizard with your application and are ready to deploy your first update, here's what you do next.
First, you create a simple text script file and upload it to your web server. This is the script URL you pass as an argument to the dll exported function WebUpdate() or the command line argument you pass to wuwstub.exe when you launch it as a child process from your application. Here is a simple example script, which does all the basics:
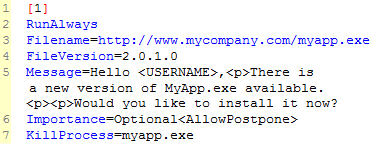
Line 1 is the script 'section number'. Each script must start with a section number, which can contain any integer value. If you have no other basis for determining whether an update is required you can simply use an incrementing 'section number' and omit lines 2 and 4. The Software Update Wizard will then update if the last run 'section number' is less than the 'section number' in the script.
You can have multiple 'sections' in a script, separated by a single empty line, though for simplicity we only have one here. You can also update multiple files within a section using the 'AdditionalFiles' keyword, or download all the files in a zip, which the Software Update Wizard with unzip for you.
An update script section must start with a 'section number', but the subsequent lines in the section can appear in any order, providing there are no blank lines. (A comment line starts with a ';' character.)
Line 2 is required to ensure that the rest of the script is parsed each time.
Line 3 tells the Software Update Wizard the location of your update file on the web server.
Line 4 tells the Software Update Wizard the version number of the new version. If the version on the user's PC is older than this then an update is required. There are other keywords available which let you make the update contingent on the datestamp, version number of one or more other files etc..
Line 5 posts a message box like this, to inform
the user of the new version. Note that this is the default look, if
you do not use any of the extensive customisation options which are documented here and in the
supplied developer help file. All the screenshots you see on this site
are easily possible and none of them have been Photoshopped to
impress!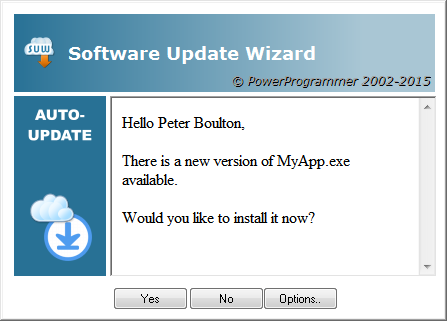
Line 6 makes the update optional to the user. The update can be made compulsory or optional, and if optional, you can allow the user to set the date they are next prompted to update. You can also change the graduated title, its text and icon, and the graphic left-side on the dialog. You can also remove various elements. The main message area is a web browser control, so you can use any valid html text or even provide the url of a web page that will appear in that area.
Line 7 causes all matching instances of MyApp.exe which are running to close, in order for the update to be made (because Windows cannot replace in-use files). A WM_CLOSE message is sent to each matching instance. If the instance does not close within a customisable timeout period then it is forcibly closed. After the update is completed KillProcess causes the updated version of the application to restart (though if preferred the automatic restart can be 'optioned' out).
Note that this example script shows just a small subset of the options that are available. Please click this link to view the developer help file page which documents all the keywords, this link which lists them alphabetically or this link that lists them grouped by category.
Step2: Upload script and updated software to web server
The last step in deploying your update is to upload the script file and the updated version of MyApp.exe to the folder on your web server that matches the update script URL in your application. Job done!
The Software Update Wizard works with any web server because it requires no server side processing.
Therefore you can upload using your favourite ftp/sftp tool, or the ftp capability built into the Software Update Wizard Project Manager Utility - a small utility provided with the developer edition to help you test and upload your scripts:

Summary
Using the Software Update Wizard to deploy your application updates really is as simple as this. Indeed, once you have a template script then the only work subsequently required to deploy an update is minor edits to change the version number check information and uploading the new files.
To summarise, the process is:

Documentation:

The Software Update Wizard comes with comprehensive documentation on all its features. Please click here to read the developer help file on line.
Integration:

The Software Update Wizard is simple to integrate with most development environments and languages. Click here for a fast start to integration.
A Quick Example:

Here is an example of how a developer would use the Software Update Wizard to deploy a new version of their software.
 See us on Facebook