
In this section we first describe the basic structure and format of a Software Update Wizard script file. Then we provide a number of example scripts, with detailed explanations of how they work.
Not every Software Update Wizard keyword is illustrated in the examples - see the keywords reference page for more information on all the keywords. However, the examples will get you started with the Software Update Wizard and to train you to at least intermediate level in its usage.
Before you read this page you may find it helpful to follow through an example update in detail. This link describes in detail how to integrate the Software Update Wizard with your software, what happens during a typical update, and some of the Software Update Wizard's additional debug log options.
Example 1: As easy as it gets!
Example 2: Notifying the user that an update is available
with a custom message
Example 3: Notifying the user if no update is currently
available (i.e. they already have the latest version)
Example 4: Letting the user choose whether they want to accept the update
Example 5: Conditional updates based on file version
number
Example 6: Updating several files at once using a Zip file
Example 7: Using an Installer file as the update file - the
Software Update Wizard downloads the installer and then runs it
Example 8: Updating the Software Update Wizard itself
Example 9: Customising the Software Update Wizard 'Look and Feel'
Example 10: Installing the Microsoft .Net Framework if
not already installed on the client computer
A script file is a simple text file which is located on your web server. Every time an update check is initiated the Software Update Wizard will download the script file, work through it from top to bottom, and process any updates that are required based on the contents of the script file.
A script file contains one or more sections.
A section is a collection of continuous lines relating to the download of a single file as an update. That single file could be an updated .exe of your application, or it could be a zip file which contains one or several updated files to support your application.
An update script can contain any number of update sections.
Each section must begin with a unique counter line, which is an integer greater than the previous integer used in the file. The integer must be enclosed by square brackets, as shown in the example below.
The counter value is used by the Software Update Wizard to determine whether an update section has already been processed on a client machine. It stores the counter of the last section successfully processed in the WebUpdateSvc4.ini file.
However, the Software Update Wizard has additional options which will give you greater control over whether updates are processed. You can make updates contingent on the version number or date/time stamp of any nominated file on the client computer. See the keywords RunAlways, CheckFile, CheckFileExists, FileDate and FileVersion for more information.
This is an example script.
This is an example script. is an optional Prophecy upgrade available.<p>Would
you like to update your Prophecy version now?</body>
Importance=Optional
Backup=Yes
[2]
Filename=/Prophecy/Prophwin.chm
WindowTitle=Prophecy Client Help
Backup=No
Importance=Optional
Comment lines start with a semi-colon character ( ';' ). Each keyword line must be on a single line - no carriage returns are supported. (The "Message=" line in the example above has wrapped round for display purposes only.)
Other than a requirement for the counter integer ( '[1]' etc.) to be the first line of any section, you can normally enter the other keyword lines in any order - the Software Update Wizard determines when the actions implied by each keyword line should be executed.
You do not have to delete sections after each user has downloaded the updated file version, although you can do so in order to keep the script file size down (bearing in mind it will be downloaded each time Software Update Wizard runs). Sections which have already been completed will be ignored at the client computer end.
The sections must be ordered oldest to newest down the file, as shown in the example above. That is, the sections must be numbered and sorted in ascending order from top to bottom of the file.
The keywords reference page documents every keyword and provides usage further examples of each keyword in action. Many of the keywords included in the example scripts below have links to the specific section of the keywords reference page so that you can read about them in more detail, if helpful.
Please note that the counter line for each of the examples below is [1]. As discussed above, the counter needs to be one higher than the last one used - we've just used [1] in our examples for consistency.
[1]
Filename=http://www.mycompany.com/updates/MyApp.exe
KillProcess=MyApp.exe
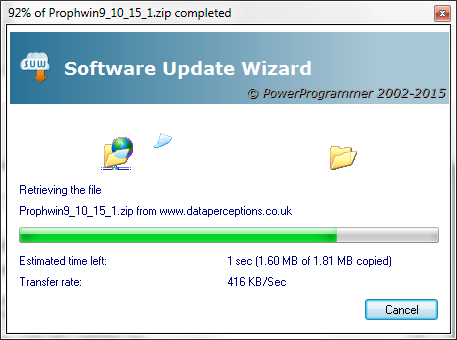
This script updates MyApp.exe. Assuming that the Software Update Wizard has been launched from MyApp.exe, the Software Update Wizard needs to close MyApp.exe prior to updating it as Windows will not allow the replacement of an in-use file. The KillProcess keyword elegantly terminates all running instances of MyApp.exe prior to the updated file being written to disc, and restarts MyApp.exe once the updated version has overwritten the previous MyApp.exe file.
Assuming MyApp.exe was running when the Software Update Wizard update call was made, the user will see the following interactions:
[1]
Filename=http://www.mycompany.com/updates/MyApp.exe
KillProcess=MyApp.exe
Message=<body scroll="no" style="font-family:
Arial, Helvetica, sans-serif; font-size: 80%; color: Green;">Hello <USERNAME>,<p>There
is an <i>absolutely fabulous</i> new version of MyApp available<p>It
will now be downloaded and installed for you.</body>
This script is the same as Example 1, but in addition a dialog message box will appear containing the html text in the Message= keyword line.
The Message= line can either contain a single line of html text or the url of a web page which will be downloaded into the Software Update Wizard message box. Software Update Wizard dialog boxes use the Microsoft Internet Explorer web control to render the html.
Note the use of the <USERNAME> constant, which expands to the name of the logged on user at run time.
Assuming MyApp.exe was running when the Software Update Wizard update call was made, the user will see the following interactions:
If you automatically check for updates in the startup code of your application you will probably require the default behaviour of the Software Update Wizard if no update is available - i.e. no interface.
However, if you allow the user to manually trigger a check for updates and no update is currently available then you will want to inform the user that their software is already up to date.
You can do this by appending a special section "[99999]" to the end of your script which contains an appropriate message advising the user they are already up to date:
[7]
Filename=/prophecy/prophecy.exe
Message=This update will upgrade your Prophecy software to version 2.0
TargetFolder=C:\Program Files\Prophecy
[99999]
Message=You already have the very latest version of Prophecy!
In this instance, if the user does not have update [7] the Software Update Wizard will download and install it the first time they check for updates.
However, the next time they check they will receive a message box with the text shown in the "Message=" line for the section starting "[99999]":
If you then insert an update [8] section into the server script file, replacing [7], the Software Update Wizard will again process this update for the user. Once update [8] has been successfully processed they will go back to receiving the message box in the [99999] section.
Note: the actual section number "[99999]" is not significant - it simply has to be the highest in the script file. It does not have to be the next sequential number. We have used "[99999]" on the basis that by the time we need "[1000000]" we will either be retired or, if we really have to, will be able to change the number to "[1000000]" in our favourite text editor (Word 2303?)!
Note: If you are using any of the visual customisation options for your message boxes please remember that the settings are local to the update section in which they appear. Therefore you will have to copy/paste them into your section “[99999]” too.
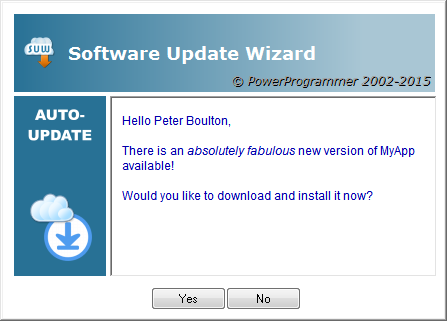
[1]
Filename=http://www.mycompany.com/updates/MyApp.exe
KillProcess=MyApp.exe
Message=<body scroll="no" style="font-family:
Arial, Helvetica, sans-serif; font-size: 80%; color: Green;">Hello <USERNAME>,<p>There
is an <i>absolutely fabulous</i> new version of MyApp available<p>Would
you like to download and install it now?.</body>
Importance=Optional
This script is similar to example 2, except that the dialog containing your Message now contains 'Yes' and 'No' buttons, allowing the user to decline the update if they wish. Note that the Message needs to be amended as the user needs to be prompted whether they want to accept the update.
The Importance keyword line determines the format of the prompter dialog. Without Importance=Optional the dialog just has an 'OK' button. With it, the dialog has "Yes" and "No" buttons.
If the update is declined then it will be offered again next time a 'check for updates' request is made.
[1]
RunAlways
Filename=http://www.mycompany.com/updates/myapp.exe
FileVersion=2.0.0.3
Message=<body scroll="no">MyApp Version 2.0.0.3 is now available and will be downloaded</body>
KillProcess=MyApp.exe
This script uses the FileVersion keyword to check whether the version number of MyApp.exe on the user's computer is older than the version available for update. In this case, if the user is running V2.0.0.2 or earlier of MyApp.exe then an update will occur. Otherwise no update will occur.
The RunAlways option saves having to change the script section number each time a new update becomes available. The script runs every time, but an update only occurs if the FileVersion test is positive.
FileVersion always uses the name of the file in the Filename line to perform a version check against. If you are using Zipfile or want to version check on a different file you can use the CheckFile keyword.
You can also use the MD5 or datestamp of the file specified in the Filename line as an alternative update trigger. See FileMD5 and FileDate. The CheckFile keyword also supports MD5 and datestamp checks as well as version number checks.
[1]
Zipfile=http://www.mycompany.com/updates/updates.zip
KillProcess=MyApp.exe
Message=<body scroll="no">Hello <USERNAME>,<p>There
is a new version of MyApp available. Would you
like to download and install it now?</body>
Importance=Optional
If your update requires the replacement of several files, you may find the Zipfile keyword preferable to Filename. With Zipfile you upload a zip file to your server which contains all of the updated files. The Software Update Wizard downloads the zip file, unzips it, replicating the folder structure from the zip into the target folder. The keyword help for TargetFolder= lets you specify a different target unzip root folder should you need to - otherwise it is the folder of your running application.
This example shows how to download and run an installation program created with InstallShield, InnoSetup or any of the other software installation creation programs.
[1]
Zipfile=http://www.mycompany.com/updates/installer.zip
TargetFolder=<TEMPDIR>
Message=<body scroll="no">Hello <USERNAME>,<p>We
will now install your update...</body>
ExecAfter=<TEMPDIR>\mysetup.exe<Wait=Yes>
ExecAfter=cmd /C del <TEMPDIR>\mysetup.exe
The installer program, mysetup.exe, is zipped and uploaded to the target web server as 'installer.zip'.
The TargetFolder keyword lets us specify that we want the zip file unzipped to the user's TEMP folder. (If you are running the Software Update Wizard as a service application, this will in fact be the Windows\Temp folder rather than the user's TEMP folder, as the service runs in the SYSTEM security context. However, this will have no effect on the syntax of the script or how it runs at the user end.)
<TEMPDIR> is one of the folder expansion constants documented here.
We provide a custom Message and then launch the installer using the first ExecAfter keyword, again using the <TEMPDIR> folder constant.
The <Wait=Yes> syntax is required in this instance because we would like to delete the mysetup.exe installer from TEMP in the second ExecAfter= line after it has finished installing the update.
(Note the use of the command processor expansion of 'cmd'. If you need to run different ExecAfters for different versions of Windows on the client there are additional control constants you can use in your ExecAfter line - see the detailed keyword help for more information.)
Updating the Software Update Wizard itself represents a challenge, as a file cannot overwrite itself. There are 3 alternative solutions you can use for this:
The Software Update Wizard uses the same approach as an installer program to address this issue - the Windows MoveFileEx() API followed by a reboot.
This example illustrates usage of the MoveFileEx and Reboot keywords. Generally speaking, KillProcess and WindowTitle should meet your requirement for replacing in-use files and should be used in preference to MoveFileEx because they avoid reboots. However, updating the Software Update Wizard is one instance where a reboot is unavoidable.
[1]
Filename=http://www.mycompany.com/updates/WebUpdateSvc4.exe
TargetFolder=<TEMPDIR>
Message=<body scroll="no">Hello <USERNAME>,<p>There
is an update to the Software Update Wizard service. A reboot will be required.</body>
MoveFileEx=From=<TEMPDIR>\WebUpdateSvc4.exe|To=<SYSDIR>\WebUpdateSvc4.exe
Reboot
The new version of the Software Update Wizard service is uploaded to the 'updates' folder of the web server and added to the section in the Filename keyword line.
MoveFileEx works by saving the downloaded file into a different location to the currently running instance. It then sets up a special registry entry (or WinInit.ini file if running under Windows 98ME) which Windows processes on the next reboot, replacing the current version of WebUpdateSvc4.exe with the downloaded version.
Therefore we download the new version into the TEMP folder. The MoveFileEx line contains From= and To= path arguments, separated by a '|' character. The From= is the folder specified in the TargetFolder line and the To= is the location of the running instance of WebUpdateSvc4.exe - i.e. the Windows System32 folder.
The <SYSDIR> folder constant expands at run time to the client computer's Windows System32 folder.
Having set up the MoveFileEx operation in the registry, the Reboot line warns the user of the impending reboot and then reboots the PC when the user clicks the 'Yes' button on the reboot warning dialog.
If the user does not click "Yes" to reboot immediately immediate then the WebUpdateSvc4.exe will be replaced at the next reboot.
The Reboot line should only be used in the update section containing the last updated component and after all the MoveFileEx operations (i.e. for WebUpdateSvc4.exe, WuWUI.exe and wuw4.dll) have been completed, otherwise the user will end up with mis-matched Software Update Wizard components. (Alternatively you can download all the components in a single zip. A single script section can contain as many MoveFileEx lines as you require.)
You can use an ExecAfter in a subsequent script process if you wish to delete wuwinstaller.exe:
Note that, depending on timings, the wuwinstaller.exe may be unable to replace WebUpdateSvc4.exe at runtime. If this happens then WebUpdateSvc4.exe will be automatically updated on reboot. If you cannot live with this and need to be able to update without a reboot you can choose Solution 3 (which is a variant of Solution 2).
This is the same as solution 2 but adds the "-Terminate 1" command line parameters to the wuwinstaller.exe ExecAfter command:
The "-Terminate 1" command causes wuwinstaller.exe to instantly terminate
WebUpdateSvc4.exe, thereby allowing it to be updated and restarted in place by
the installer. The downside of this approach is that any update script
sections after the section that updates the Software Update Wizard will not be
processed within that update check. On future update checks the script
section which updates the Software Update Wizard will not need to be processed
and therefore the subsequent sections will be processed normally.
(Note for developers: The latest evaluation download from our website at http://www.powerprogrammer.co.uk always contains the latest versions of the Software Update Wizard. If you install this download over the top of your registered version the registered licence file will NOT be overwritten. Therefore installing the latest eval is one way of updating your developer installation to the latest version. Alternatively, the Software Update Wizard Project Manager performs an update check (using the Software Update Wizard, of course!) when it starts up and will offer you the latest update if one should be available.)
This script shows how the look and feel of the Software Update Wizard dialogs can be controlled from your script.
[1]
Filename=http://www.mycompany.com/updates/MyApp.exe
Message=<body scroll="no" bgcolor="#FFFFFF"
background="http://mycompany.com/images/blocks.gif"><p><font face="Verdana,
Arial, Helvetica, sans-serif" color="#0000CC"> This is a heavily customised page,
showing what you can do if you let your html run away with you!</font></p><p>
<img src="http://mycompany.com/images/powerprogrammertiny.gif" align="right"></p><p
align="left"> <font face="Arial, Helvetica, sans-serif" size="2"> <a
href="http://www.dataperceptions.co.uk">Click here for more!</a></font></p></body>
Importance=Optional
KillProcess=MyApp.exe
Bitmap=<PROGRAMFILES>\MyApp\mybitmap.BMP
Icon=<PROGRAMFILES>\MyApp\myicon.ico
DialogBk=204,204,255
TitleBk=255,255,255,0,0,255
TitleTxt=255,255,255
Title=MyApp Corporation<Verdana>
Subtitle=Update Wizard
The default 'look' is shown first. The customised 'look' is shown second:

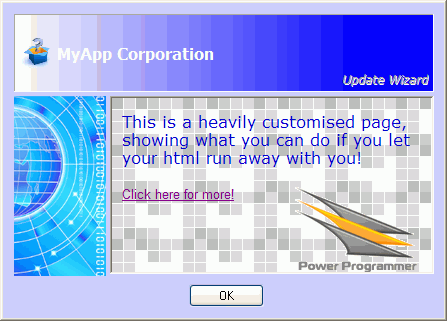
You can decide which is nicer! But the differences at least highlight the items you can change.
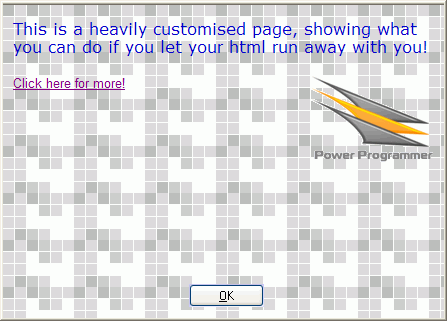
You can also use advanced Message= options to make the web control field cover the bitmap to the left ("<nobitmap>"), the graduated title area ("<noheading>") and overlap the buttons ("<overlapbuttons>"). If you use all 3 in combination then the web control field covers the entire dialog, as in ...
... you will get a Software Update Wizard dialog that looks like this:
This script was kindly donated by Jeff Hall.
[1]
;Download and install the .NET 4 Full Framework if
necessary
Filename=http://download.microsoft.com/download/9/5/A/95A9616B-7A37-4AF6-BC36-D6EA96C8DAAE/dotNetFx40_Full_x86_x64.exe
SubmitVariable
<NET4FULLINSTALLPATH>=HKEY_LOCAL_MACHINE\SOFTWARE\Microsoft\NET Framework
Setup\NDP\v4\Full\InstallPath
CheckFileExists=<NOT><NET4FULLINSTALLPATH>\mscorlib.dll
Message=This update of will
download and install the Microsoft .NET Framework 4. This may take several
minutes.
ExecAfter="<CLIENTFOLDER>\dotNetFx40_Full_x86_x64.exe"<Wait=Yes>
Please see the Campaign Manager help topic.